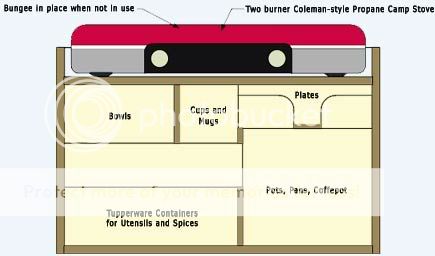
My galley box design features separate compartments for plates, bowls, and mugs. You can size these compartments for disposable plates, bowls, and cups, but I like unbreakable dinner-ware such as Melmac or Corel, which makes mealtime a lot less like camping. Slotted compartment fronts allow access to the dishes while restraining them in place. Slide-out plastic trays hold the silverware and most galley tools. The frying pan fits in the top of the bowl storage area under the stove. A block in the top of the box holds knives, while two other compartments hold the spice kit and a small coffeepot nestled in the small pot. The spice kit is the only “food” carried in the galley box; all perishables are stowed separately, and “iron rations” (canned goods) are likewise stored in other locations. When leaving the boat, I have only to take off the cooler and perishables. The rest of the galley, including the galley box, stays on board 99 percent of the time. I left the top of my box open to receive the stove. I use a couple of bungee cords to secure it in place and keep it from bouncing out in rough weather or during transport. Another feature I added is a front panel that folds down to form a work surface. Small chains hold the panel level when it’s open, so it doesn’t need any other supports. Handles fastened to the box make moving it around easy.
The galley box comes in handy for car-camping, too. I can remove it from the boat, put it in the car, and know that I have nearly everything I need, already organized. I just need to remember to take a propane canister along. On the boat, propane canisters are stored in a holster attached to the stern rail. I’m a great proponent of making mock-ups of major projects before cutting expensive material or discovering that your wonderful improvement doesn’t fit the available space. A mock-up will allow you to put the gear in place and then place the galley box where it’s intended to live. It sounds like a bit of work, but mock-ups are well worth the trouble for discovering any potential faults or problems in a design like this.
My favorite material for a mock-up of this size and complexity is artist’s foam board. This material consists of a layer of stiff foam with card stock laminated on both sides. The product is easy to cut yet stiff enough to stand a certain amount of use to determine the utility of a design. It is available in 3⁄16- and ⅜-inch thicknesses. For this project, the ⅜-inch material works well, as it is close to the thickness of the materials you will use for the box. The first steps in designing a galley box are to decide what will go into the box and where the box will go. It is good to have some prior experience cooking on your boat, as I did, so that you know what gear the box should accommodate.
Here is list to get you started:
- Galley Gear
- Stove (fuel is carried outside the cabin)
- Dishware: plates, mugs, soup bowls
- Cookware: Frying pan, pot, teakettle/coffeepot
- Silverware
- Galley tools: stove lighters, can opener, church key, spatula, large spoons, cooking knives
- Spice kit
- Toothpicks
- Hot pads
The box can be made from plywood or StarBoard polymer “lumber.” In either material, ⅜-inch thickness for the case and ¼-inch thickness for the partitions would provide a good strength while keeping weight down. I recommend against using standard exterior plywood, as it’s too rough and too subject to rot. Instead, use okoume, A/A fir, or MDO plywood, all of which can be found online or at specialty lumberyards. StarBoard in ⅜- and ¼-inch thicknesses is hard to find at retail stores, but it is available.
If you’re working with plywood, the sides, back, and bottom of the box should be glued and either screwed or nailed together. (As nothing sticks to StarBoard, the entire box will have to be screwed together with stainless steel self-tapping screws.) All exposed surfaces should then be well sealed to protect against water damage. For additional protection, round over the bottom edges of the box and apply a layer of 3-inch-wide fiberglass tape with epoxy. Fasten a pair of handles on the ends.
Whether you build the box from plywood or StarBoard, I recommend making the front panel from StarBoard. Hinged down and held in place by chains, it can be used as a work surface or a cutting board. No two galley boxes will be the same, but that’s a good thing. You can customize the box for exactly the equipment and the space you have on board.

0 comments:
Post a Comment